The Maitreya Project - Technical Innovation on a Grand Scale
Copper Applications in Architecture
Background| Original Sculpture| Translation to Computer Model| Model Modification| Conversion into Discrete Panels | Mould Making and Casting| Welding of Panels| Statue Construction | Future Progress| Acknowledgments
Geoff Greetham discusses the technical innovations that were needed to solve the challenge of building a 500-ft statue of Buddha - i.e. a statue that would be over 3 times as tall as the Statue of Liberty.
Background 
The Maitreya Project includes the building of a 500-ft (152.4-meter) high, 50-story statue of the Buddha Maitreya, which is expected to stand for 1,000 years. The general background to this project was covered in a previous report. Since that article was written there has been one significant change. The site, initially in the state of Bihar (India), has been moved due to administrative difficulties. It will probably be situated in the north Indian state of Uttar Pradesh, which has four of the eight Buddhist pilgrimage sites in India within its borders.
The original technical team that had to decide what the statue would be made from and how it would be constructed toured extensively. They gathered information on existing large statues, including two large statues of Buddha in China (Wuxi and Pu Tol Shan) and Japan (Ushiku). Both these statues had been cast in bronze. Originally, alternative materials were considered, which included stone, concrete and a formed metal shell over an internal support structure. Stone was considered unsuitable for the complicated shape, for example, the extended arm would not be self-supporting. It would have to be re-enforced with steel bars, a prospect that was considered too hazardous for a 1,000-year life span. Concrete would also need re-enforcing and, from experience, would probably not last.
Forming a shell in-situ from thin copper or copper alloy was discarded due to the time-consuming work required and the need to withstand 1,000 years of atmospheric corrosion. Sheet thick enough to last 1,000 years would be too stiff to form by hand, hence, the final decision to use cast plates.
The solution finally chosen was to hang a cast metal shell (corrosion resistant and possibly expensive) on an internal steel supporting frame (strong and relatively inexpensive). The computer simulation shows the intended construction, which is effectively 51 stories high, with a throne of 17 stories.
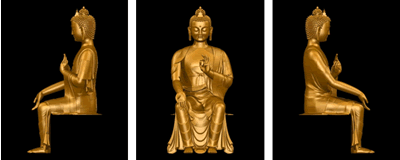 Figure 1. Computer Views of the Statue.
The construction of such a large statue is not be a simple affair and would involve casting several thousand individual plates and attaching them to the support frame. To give some further idea of scale, the Statue of Liberty is about 150 ft (46 meters) high, and the hair curl is half as tall as a man.
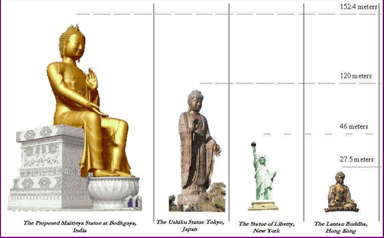
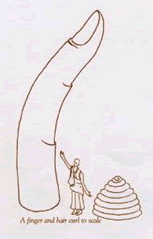 Figure 2. Statue Scale Comparisons.
It clearly would be a civil engineering achievement of the highest quality. So how would it be accomplished? How would such a major project be pursued?
Original Sculpture 
The starting point was the sculpting of an approximately 1/100th scale model of the Buddha Maitreya in 1997. The two sculptors, Peter and Denise Griffin, carefully sculpted a model using ancient scriptures and the advice of Buddhist masters, such as Lama Thubten Zopa Rinchope and the man who conceived the project, Lama Thubten Yeshe. It was essential that the proportions were absolutely correct, and traditional details, such as placing patches of material on the robe and placing two corners of the robe in the upturned left hand, were included. At one stage of the development of the prototype, the statue was taken to Nepal for practical advice from the Tibetan master sculptor, Chemo-la. Thus, the finalization of the definitive sculpture in May 2000 was, in itself, a significant achievement. It took several years to complete the transition from the religious painting to final sculpture.
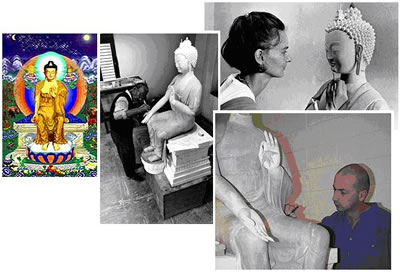 Figure 3. Original Sculpture.
Translation to Computer Model 
Having now produced an acceptable statue, the task began of translating it into a civil and structural engineering reality. The first step was to convert the solid image into a digital form that could be scaled-up to final design size.
The sculpture was scanned using an optical Moiré fringe technique. Moiré fringes are produced by the interference of two beams of light with wavelengths that are very close together. The result is to produce bands (fringes) of light and dark as the light beams either enhance or cancel each other. The fringes are projected onto the solid image, and the distortion in the fringes as they strike the surface of the image are recorded by a digital camera. It is possible to resolve differences as small as about 10 µm using this technology. The final equipment used was a Breuckmann optoTOP scanner.
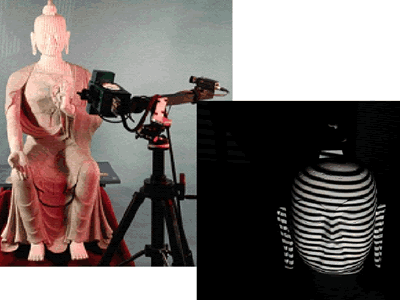 Figure 4. Scanning the Sculpture.
The data from the camera was processed by computer to produce a "cloud" of points, such that the coordinates (x,y,z) of each point represents a point in space describing the surface of the scanned sculpture. This series of points was processed to give engineering substance to the data. The software to accomplish this transformation was CopyCAD by Delcam plc. Initially, the cloud of points was converted into a triangulated net, then to a wire frame model, which was finally shaded to give the surfaces depth and present a 3-D aspect to the computer model.
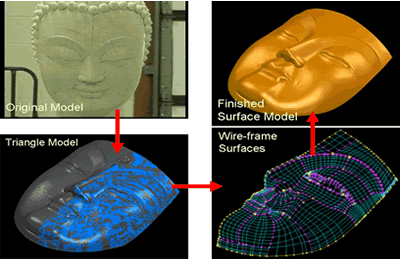 Figure 5. From Original to Model.
Once the shaded model had been produced, there followed a period during which the computer model was retouched with input from the artists. As the model had been scaled by a factor of about 100, it then became apparent that smoothing had to be carried out on the final computer model. It should be remembered that a small 1 mm error in the sculpture would become just over 108 mm on the final statue. The accuracy achieved was to create a scanned model in which the computer generated surface deviated from the true sculpture surface by +/- 0.1 mm or less. This computer model has now formed the database from which all other activities flow.
Model Modification 
Once the surface had been modeled using CopyCAD, CopyCAD and a complementary program, PowerSHAPE, were used to modify the model.
The computer model was divided into four major sections; head, body, legs, hands and feet and each section worked on by a separate team to speed-up the modeling phases of the project.
Where appropriate, mirrored surfaces were generated, allowing perfect symmetry and uniformity to be achieved that was essential for the accurate portrayal of the Buddha as defined by scripture. Figure 6 shows, from left to right, the starting computer model in CopyCAD, the optimizing of the toes using PowerSHAPE mirror symmetry where appropriate; and the final foot.
 Figure 6. Feet Model Detail.
This kind of smoothing and symmetry building was carried out for all four sections of the statue until a completely satisfactory computer model had been achieved.
The computer model was also passed to other engineers concerned with the generation of the support structure and for finite element analysis of the statue and the civil engineering structure supporting it.
There was also a requirement to modify the outer shell to provide expansion joints, regions where heat could be naturally vented from within the vast interior, gutters to allow rain to escape, and maintenance access. All this had to be achieved without violating the artistic integrity of the statue.
Conversion into Discrete Panels
In order to be able to construct the statue, it had to be subdivided into individual panels which could be individually manufactured, a task accomplished again with computer assistance.
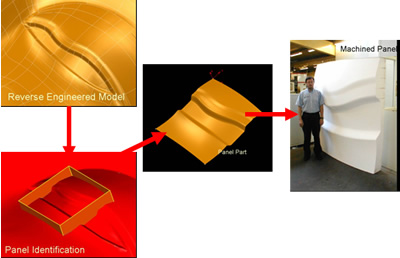 Figure 6. Panel Conversion.
The PowerSHAPE software divided the computer-generated image into about 6,000 unique panels, each one 2 m x 2 m. Where necessary, expansion joints were added at this stage, together with location features, and each panel was given its own thickness. To anticipate the welding process additional material was also added to the edges as machining allowance. As the alloy chosen was BS 1400 AB2, (nominally 79% Cu, 4.5% Ni, 9% Al, 4.5% Fe, 3% Mn), similar to C95800, it was considered that in 1,000 years corrosion would remove about 2.5 mm by general corrosion, and there would be about 2.5 mm corrosion due to pitting. As a consequence the minimum thickness of any panel was put at 10 mm. Each panel has its own unique CAD file and is part of a large 3-D jigsaw that will eventually be the completed Buddha. The thickness of each panel has to be kept to a minimum, as every 1 mm thickness on the skin increases the material cost by approximately $1 million. The ultimate thickness will probably be decided by the casting route finally chosen.
Mold Making and Casting 
Having to cast some 6,000 unique panels, in total about 2,500 tonnes of bronze, presents quite a problem. Mold making had to be simplified in order to reduce costs and speed up the mold making process itself. To this end, the Castings Development Centre developed a technique that uses resin-bonded sand blocks. Using the computer model and yet another complementary item of software, PowerMILL, the panel contours are cut directly into the resin-bonded sand, eliminating the need for a solid pattern to be made for each panel. The cycle time is about one hour per mold. (All of the machined away sand/resin is recycled for other panel molds). From the development work, CDC designed a dedicated unit specifically to machine the resin-bonded casting panels.
Casting trials have been undertaken, particularly at Westley Foundries, to establish whether the 2 m x 2 m panels can be cast and at what minimum thickness. It was thought that complex panels would be more difficult to cast, especially to prevent distortion on casting. In fact, the flatter panels have proved to be the most difficult. Conventional static mold casting was trialed with some success. However, to avoid turbulence in the mold during filling with molten bronze, which would entrap air and cause porosity, the Durville casting technique was also tried and found to be relatively successful. (This is effectively like pouring a beer slowly down the side of a slightly turned glass to prevent undue amounts of froth). As the mold fills with an unbroken smooth stream of molten bronze, it is raised into the vertical position. In addition, by altering the gating of the molten metal into the molds, aided by computer-generated modeling of the casting process, it was possible to cast panels, usually about 12.5 mm thick; the absolute thickness depending on the individual panel. Each panel was radiographed to an agreed ASTM standard to ensure soundness.
Figure 8 shows an as-cast panel, the same panel cleaned by shot blasting, and also the position of the panel in the eye of the Buddha. The final choice of static mold casting or Durville casting has yet to be made.
 Figure 8. Cast to Final Conversion.
Welding of Panels 
Alloy AB2 is known to be weldable. The welding procedures necessary to join the panels were developed by Scomark Engineering Ltd. Tungsten inert gas welding is some three times slower than metal inert gas welding, consequently MIG welding was adopted as the standard technology. Welding rod, 1.2 mm diameter was used for the trials. The welding rod composition was to AWS A5.7 ER CuNiAl (nominally 82% Cu, 4.5% Ni, 9% Al, 3% Fe).
In order to minimize distortion and improve surface finish during welding, various procedures were tried, including pulsed, no-pulse, and double-pulsed welding. The final welding was carried out from both sides of the panel using a Fronius Pulsed Sinergic MIG unit. Depending on the panel thickness, between 4 and 9 passes had to be made to complete the joint. After welding, the joints were again subjected to radiography and die penetrant inspection to an acceptable ASTM standard. In all, some 12 standard procedures were developed to account for the various panel thicknesses, their complexity, and the orientation of the panel joints during the welding process.
After welding, the weld was ground flat and sand blasted and left with no further surface treatment.
The edge preparations identified during this stage of the development were fed back to the computer model so the as-cast panels could be machined to size with the correct edge preparation for any unique panel. Again, machining was controlled by the PowerMILL software, which created tool paths for each panel.
Statue Construction 
It is anticipated that panels will be welded together on site in batches of 9. They will be ground, sand blasted, radiographed and then inspected against the master computer model using PowerInspect. The 6 m x 6 m composite panels will be mounted on an aluminium bronze sub-frame and then hoisted up into position and fitted to galvanized steel support structure using insulating connectors to prevent galvanic corrosion. Although the outer shell will last for ,1000 years, it is probable that redundancy will have to be built into the steel support structure to allow repairs to be made during the lifetime of the statue.
As construction proceeds, the statue will be surveyed using laser theodolite surveying equipment, again checking against the master model.
Future Progress 
It can now be appreciated that the task of engineering this colossal monument has only been touched on here. There is still a considerable amount of technical effort needed to see the project through to completion, including the manufacture of mold machining equipment; the setting up of foundry facilities in India with the necessary quality control procedures; gathering together welding expertise, again, with quality control procedures; and a whole raft of supporting technical services to monitor the progress of the build.
No mention has been made of the internal architectural arrangements, which, in themselves will be innovative and inspiring and will make interesting reading when details are published.
When completed this will be, as has been said many times elsewhere, a true wonder of the world, and will again rely upon the extraordinary corrosion and strength properties of copper-base alloys for its survival.
Acknowledgments 
Thanks are due to many for assistance given. They include Alan Ockenden and David Greenhalgh of Mott MacDonald; Rudy Harderwijk of Maitreya Project International; Hugh Humphries and Chris Lawrie of Delcam plc (also for the illustrations); Tom Westley of Westley Group Ltd; and Neil Waters of Scomark Engineering Ltd.
CopyCAD, PowerSHAPE, PowerMILL and PowerINSPECT are trade names of Delcam plc. OptoTop is a trade name of Breuckmann GmbH.
Also in this Issue:
- The Maitreya Project - Technical Innovation on a Grand Scale
